

 |
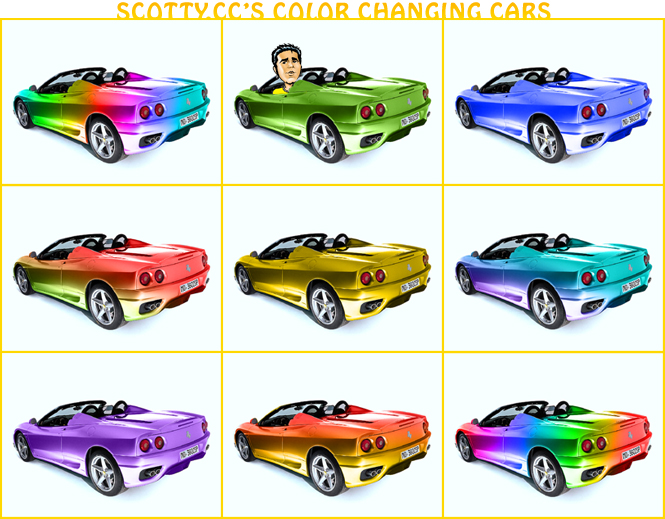
Color
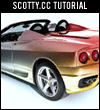
Change a Ferrari 360 Added:
12/29/2004
Using this beautiful silver Ferrari 360 Modena
we're going to alter the exterior color to give it
an even more exotic look. Click here to learn how
to change to a solid color or 2 color fade using
this free 2 part tutorial! |
| Steps |
9 |
| Difficulty |
Easy |
| Views |
10832 |
| Program |
Photoshop 7 |
| PRICE |
$0 | | | This tutorial is free, Tell-A-Friend! Click
here!
| Photoshop
Color Car Step 1 |
 |
|
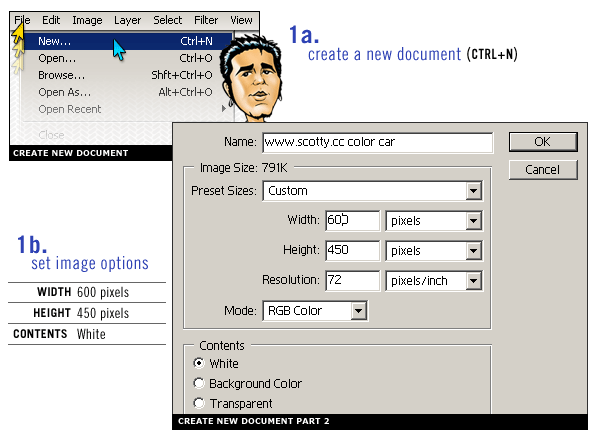
1a.
Create New Document
First thing is first,
lets start out by creating a new document.
Either click File from the menu,
then New; Or use the shortcut
CTRL+N.
1b. New Document Settings
In
this example we're using the dimensions: 600
width x 450
height.
|
| Photoshop
Color Car Step 2 |
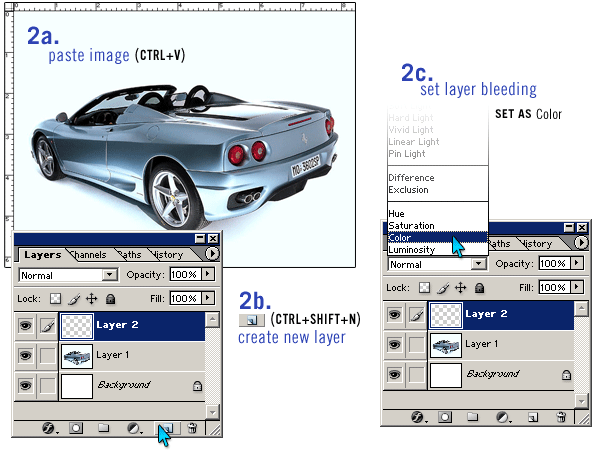 |
a.
Paste ImagePaste this image into your document
by clicking Edit > Paste
or using the shortcut
CTRL+V. b. Create New
LayerCreate a new layer by clicking the
'Add Layer' button on the layer pallet, or use
the shortcut CTRL+SHIFT+N. c.
Set Layer BleedingWhile the new layer is
selected on the layer pallet select 'Color' from
the 'Layer Bleeding' menu on the Layer
Pallet. |
| Photoshop
Color Car Step 3 |
 |
|
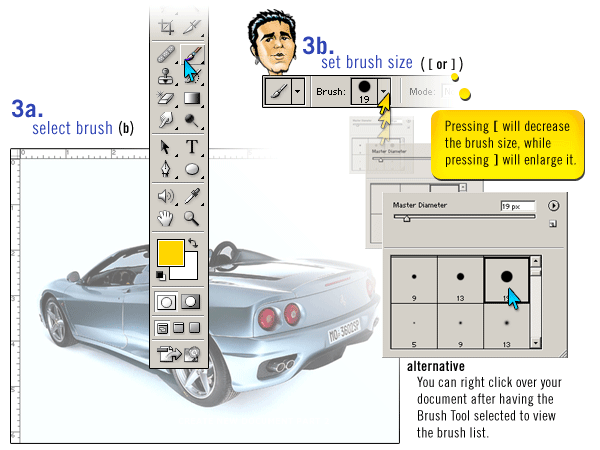
a.
Select Brush
On the Photoshop Toolbar
click the Brush Tool, or press B on your
keyboard as a shortcut to this
tool.
b. Set Brush Size
After
selecting the Brush Tool set the brush size to
work with, it's best to use a SOLID brush of
size 15+ for this image. To set the brush size
on the top toolbar click the arrow next to the
currently selected Brush. As an alternative you
can also right click inside your document to
make this window
appear.
|
| Photoshop
Color Car Step 4 |
 |
|
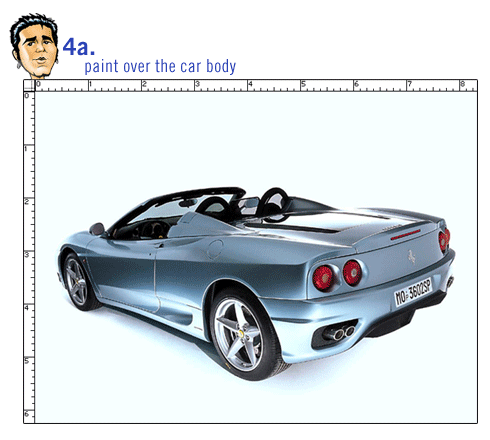
a.
Paint the Car
Now Select your color &
paint. In this example I'm using the yellow tone
'#FFD300' (hex value). After your color is
selected, using the brush tool, paint over the
body of your car. You should instantly see the
color conversion. For now, cover the entire
body, don't worry about making it flawless.
We'll handle the touchups on this layer in the
next
step.
|
| Photoshop
Color Car Step 5 |
 |
|
a.
Touch-ups
Time to clean up our paint that
ended up overtop of our Rear Lights, Mirror,
License Plate, and Ferrari Logo
accessories.
Use either the eraser or
layer masking on the current layer to touch up
these color flaws. I use layer masking (if your
not familiar with layer masking check back at my
site soon for a tutorial, for now use Eraser).
Also touchup the border the same way as
the
accessories.
|
| Photoshop
Color Car Step 6 |
 |
|
a.
Solid Color Final Result
If your goal was
to just change the color to another solid color
this is where you will stop. However if you wish
to continue for a few more steps I will show you
how to create a 2 color
fade!
|
| *EXTRA*
Photoshop Color Car Step 7 |
 |
|
a.
Make Selection
While on the layer with
the new color hold in CTRL and click the layer
it's self on the layer pallet. This will form a
selection around your color on the
document.
B. Create New
Layer
While the selection is still on
make a new layer by either clicking the button
on the layer pallet or by using the shortcut
CTRL+SHIFT+N.
|
| *EXTRA*
Photoshop Color Car Step 8 |
 |
|
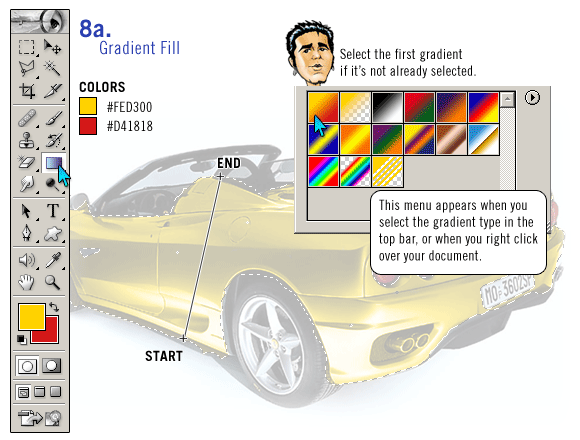
a.
Gradient Fill
While on your new layer
with the selection still on pick the 'Gradient
Tool' on the toolbar or use the shortcut
G.
Now set your forground &
background colors, in this example I'm using
#FED300 & #D41818.
Now click on your
image near where I have 'Start' labeled. While
holding down the mouse button drag upwards
towards where I have 'End' labeled and release
the mouse
button.
|
| *EXTRA*
Photoshop Color Car Step 9 |
 |
|
a.
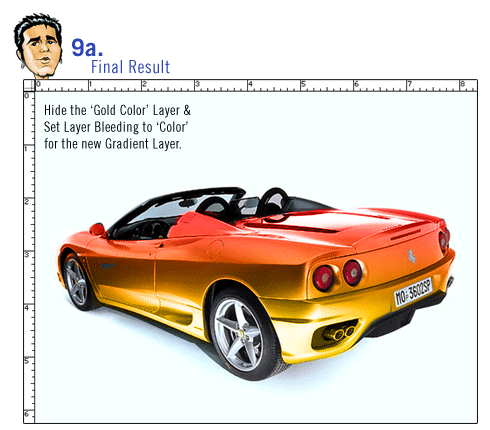
Final Touches
Now to finish it up set the
'Layer Bleeding' mode to 'Color' for the new
gradient layer. (Just like you did in Step
2)
Now hide the original new color layer
(the gold layer in my example), by clicking the
EYE icon next to the layer on the layer
pallet.
If you want to try a different
gradient or solid color return to step 7 and
continue from there. Skip step 8 if your going
to do a solid color rather then
gradient.
Hope you enjoyed &
learned something from this tutorial!
| |
Comments?
Questions? I'm ready to listen, click here
to send them in!
| |
| |
|